Friday, May 28, 2010

Orchids!


This is the cattelaya orchid that is the ONLY orchid I've ever been able to grow in the house.

It blooms once a year these days, but when I first bought it about 10 years ago, it was blooming when I bought it and then didn't bloom for about 5 years.

Turned out, it wasn't getting enough light! I had a big ole ash tree in the backyard, directly behind the kitchen that was blocking enough light that this poor thing never bloomed.

I ALMOST threw it away. Then I had to have the tree removed (it was HUGE, and the roots were cracking the patio slab). And wouldn't you know it - the orchid bloomed that year!

I learned, after some research, that one of the reasons people think orchids are hard to grow (they're not) is because you have to figure out the light level and humidity --- well, this one sits right above the kitchen sink, so obviously, it's happy with the humidity.

The other advantage it has is that it IS right above the kitchen sink, and because it's right there in front of me, it gets more attention (i.e., water!).

I have a couple other cattelaya orchids on the patio - they bloom intermittently. This year the brown/red one bloomed, but the other one never did..

I also have some cymbidium orchids - you know, the ones they use tons of for the Rose Parade floats. They, too are pretty easy - but I found out they don't like direct sun.

Another instance where it didn't bloom until I put it in filtered shade - gee, just like where they live naturally! Whoda thunk?

Here's another plant that I have above my kitchen sink. It's a hoya, and is being grown hydroponically.

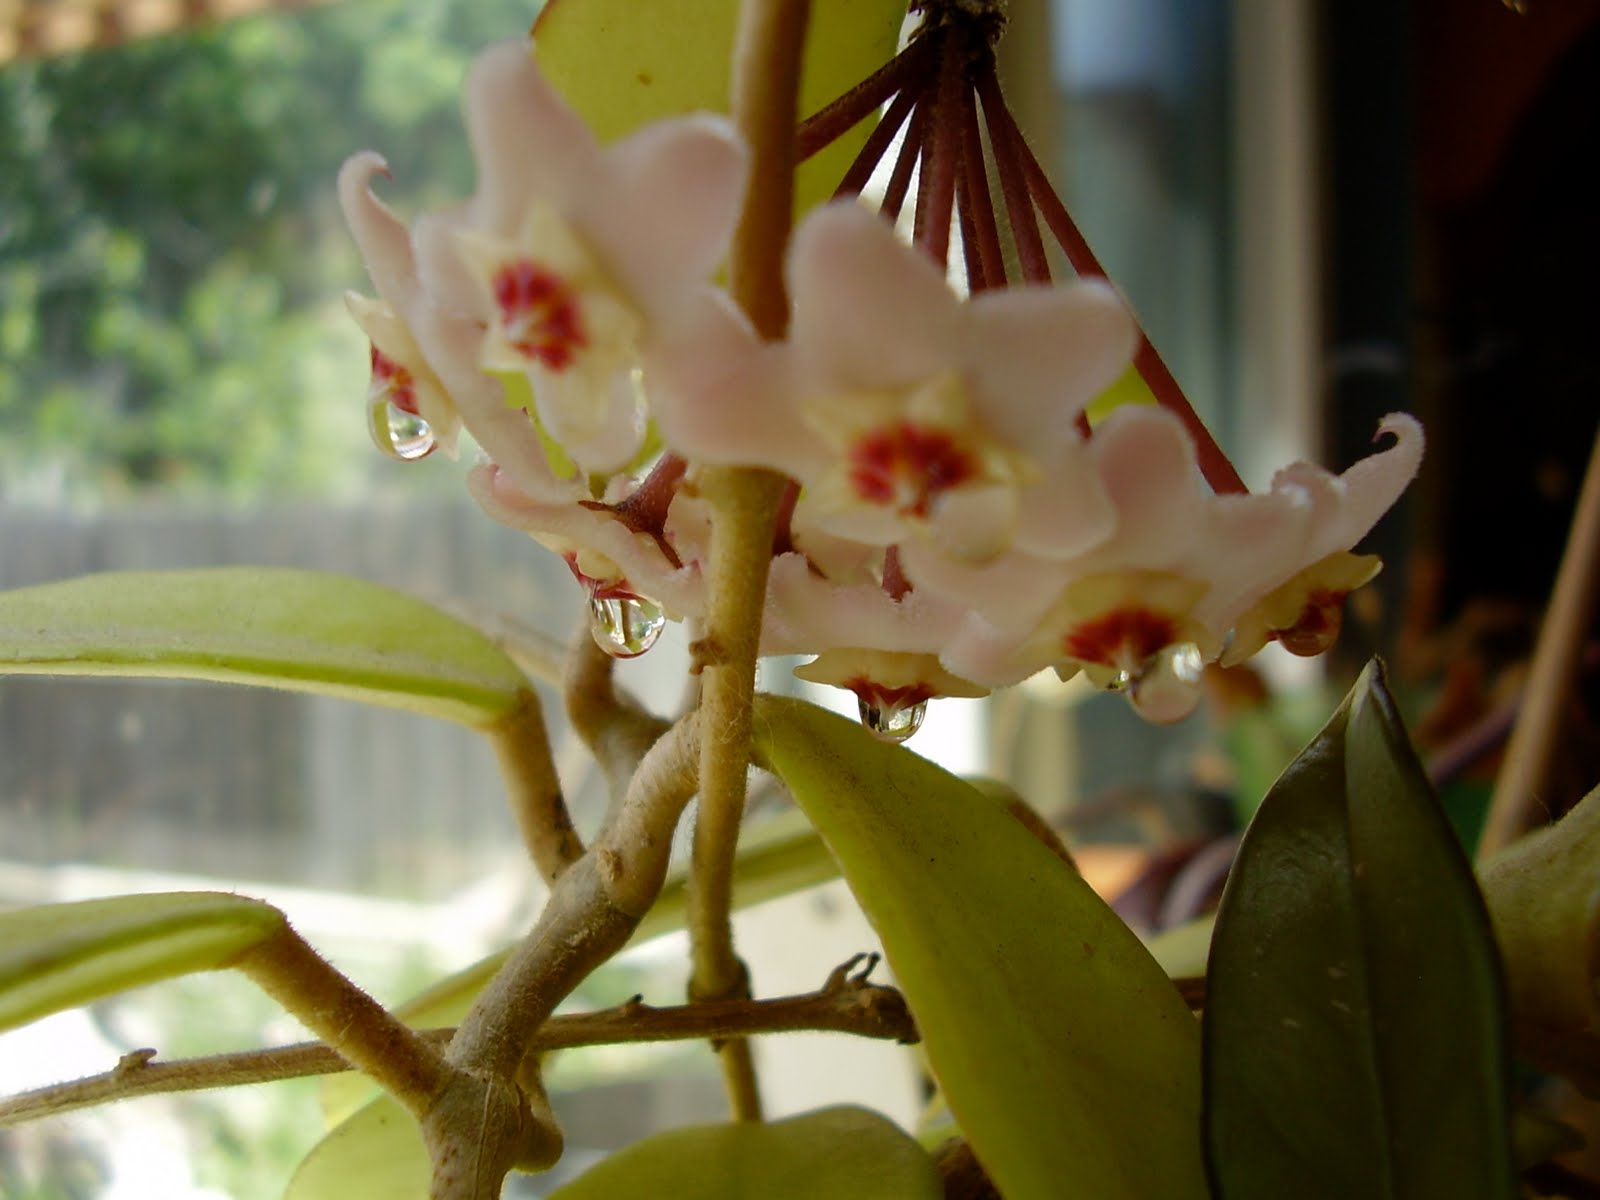
This is a cutting from a friend's mother's plant - it's about 20 years old.

It doesn't bloom all the time either. But this year, I happened to notice the bloom and took some pix.

Notice the "dew" dripping from the flowers? I'm told that attracts bees and hummingbirds out in the wild.

I really don't have anything stamped to show you tonight. I've been making the Thank You ATCs that I put in the Stamp Club orders each month, but that's ALL the stamping I've done lately.

This weekend I'll be going to my friend Roxy's in Nevada so I spent a little time tonight gathering up supplies so I can show her (if she hasn't already seen them) both the Black Magic and burnishing techniques.

She's a stamper, too, so we always try to have something to share with each other when we get together. I'll be sure to show you what I learn from her, OK?

The master bathroom is coming along nicely.

"Dr Destructo", as I call him, has completely gutted the bathroom, and has pretty much put it back together this week.

Tomorrow he starts mudding the new dry wall. Then on to installing the tile, painting, putting down the floor, etc.

Stay tuned for before and after photos, hopefully next week!


Have yourselves a happy and SAFE Memorial Day weekend!

Stamp a little!

A+

A+ - that's the grade I give this card that Natalie brought along for our swap!

Always simple cards from Natalie - but they're also always striking.

And VERY duplicatable. (is that a word?)

Very easy to be copied! How's that, instead?

Natalie used the "First Day" set from the Summer mini-catalog.


And used the returning color Pacific Point as the base of her card. Along with Real Red polka dot ribbon (one of my faves), and matching piece of striped Pacific Point DSP as a counterpoint.

Very striking - and very simple!

My swap card this month was one of those I made using the burnishing technique I shared with you a week or so ago.

For this example I used the Fifth Avenue Floral stamp set.

It came out quite nicely, wouldn't you say?


The master bath is in the process of being renovated now. So I'll be out and about tomorrow picking up more bath tiles, bull-nose and otherwise, along with paint, and choosing a vanity (and hoping the one I want doesn't have to be special ordered!).

Stay tuned for some Before and After pix of the ongoing changes here at my house!

In the meantime, drag those stamps out and MAKE SOMETHING!

Happy stampin'

Thursday, May 27, 2010

Copying IS OK!


Check out this card that Patti made for our Team Meeting this month. She copied it directly from the catalog (page 94, big catalog). This is the second month she's done that, and I really like that she does!

The cards are so much more beautiful in person, of course. And a photo isn't really much better than having the sample in the catalog.

But when you see the cards "live" (and feel free to stop by and look!), they're so much more stunning!

My point is, it's OK TO COPY!

That's why Stampin' Up! gives us such beautiful samples!

Found one you like? You can, of course, call me for help in determining which products were used to make the item - and I'll be happy to take your order for whatever you don't already have to make it!

Here is another card that was swapped at our May meeting...


Del deliberately made this card with all discontinuing colors - just so you'd have one last chance to look at what's soon going to be gone.

Isn't it beautiful?

Cameo Coral, Apricot Appeal, Gable Green...

Do you need pads, re-inkers or markers for any (or all!) of these colors? Call or email and order to me soon!

A lot of the discontinuing color's items are already on back order - which means, we can still order them, even though Stampin' Up! is having to place another order to get them to you.

At some point soon, though, SU will no longer be able to get the product, and it will change from " Back Order" to "No Longer Available" status. Don't dilly-dally! Call me and order today!

I'll have more cards to share with you tomorrow. C'mon back!

Wednesday, May 26, 2010

Richard - My Neighbor, My Friend


We all have those cards that we must make, but never really enjoy making.

Sympathy cards.

I, luckily, haven't had to make one for a very long time.


My neighbor of 23 years passed away last week. Not suddenly, but much too soon, and much too quickly. He was my "go to" guy. If I needed something (and I tried not to do that very often), I'd ask Richard, and he'd have a logical, well-thought out answer.

Once, several years ago, I asked him if he could fix this aluminum skillet I've had since I got married a zillion years ago.

The skillet's lasted MUCH longer than the marriage did, but it's one of my favorites. It makes an awesome fluffy omelet - you know - the kind you have to whip the whites, fold in the yolks, and bake in the oven. And cooks up those scrambled eggs like a dream, too.

After all these years, the rivets that hold the handle on, were getting very loose. Each time I used it, I was afraid the handle was going to break while I was carrying it from the stove.

I envisioned him having to weld it together, and didn't expect to see it for at least a couple of days.

Darned if he didn't hand it back over the fence in less than an hour. All fixed and ready for me to use again! Thanks, Richard! For everything!

I've been SO fortunate in having caring neighbors. None of them are "in your face" - just friendly, and there when you need someone or something.

My neighbor across the street, Polly, babysits my furry Kidz when I have to go out of town. She spoils them rotten while I'm gone - and they all come a runnin' when they hear her come to the door!

Each one comes in to say hi and then skedaddles - except for Velvet. She sticks around cuz she knows Polly's gonna make a huge fuss over her. Not that Velvet's not loved - but it's definitely a different kind of love from Polly.

I love living in my neighborhood. Thanks, Polly and all the rest of you.

And the neighborhood will sorely miss you, Richard. RIP.

Friday, May 21, 2010

Card Template # 3

Here's the third card template we made in Stamp Club this month.

I wanted something that used a shape other than rectangles. I'll be honest - I'm not a huge fan of circles.

Can't tell you why, I'm just not.

BUT, circles are certainly different than rectangles, so here's the third template.

It, too, is difficult to see, but has a 3/4 x 5-1/2 strip along the top, three circles equally spaced on top of the 3-1/2 by 2-1/2 center piece.

On top of the card base, there's also a piece that's 5-1/2 x 2.


The sample I made shows it so much better, don't you think?

I used a piece of Old Olive I'd run thru an embossing folder for the top piece.

The bottom piece is from the Island Oasis DSP in the Summer mini (117173 $9.95).

The card base is So Saffron, the saying from On Your Birthday (111664 $33.95), layered on to Old Olive again. The flowers are from the Tropical Party set (Summer mini 118515 $17.95), punched out with the 1-1/4 inch punch.

This is a very bright and cheery card and is rather generic, so could be used for anyone.

I hope I've inspired YOU to try to make up some card templates! They're so handy when your creative juices aren't flowing, but you need to make a card or two.

You're copying - but from yourself! How cool is that?

Happy stampin'!

Thursday, May 20, 2010

Card Template #2

Here's the second card template we made in stamp club this month.

I realize it's difficult to see, so let me describe it for you.

It's a 5-1/2 x 4-1/2 card that's got a center layer piece cut to 3-1/2 x 2-1/2.

There are two smaller pieces 2-1/2 x 1/2 inch toward the top and the bottom of the card.

A VERY simple card, don't you think?


Here's the same orientation sample I made.

I used the bear from the Teddy and Train (115219 $17.95) set as my main image.

I also used the rattle from the set in tone on tone to create a background for the card, then added two pieces of Brilliant Blue CS as accent pieces.

A VERY simple card.

I used the burnishing technique on the bear, and then colored in his hand and foot pads with a marker. His bow was colored with a marker, as well.


This is the other orientation for this template.

I used a stamp from the Elements of Style set as the main image as background (Dusty Durango). And then stamped another stamp from the same set in tone on tone. In this instance, it's Crushed Curry.

It's a nice subtle look, and easily done.

I started with a larger center piece, but after using the Pinking Hearts punch (YES! it, too, is still available! 117649, $15.95), it was smaller than I would have liked.

So, I just stamped my greeting on a piece of Dusty Durango CS (matching the ink color of the main image), punched it out with an oval punch, then layered that on to a piece of white CS punch with the scallop punch.

Added a couple of pieces of Dusty Durango DSP and the card was finished!

Come back tomorrow to see the third, and final (for now!) card template.

Wednesday, May 19, 2010

Card Template # 1

For our stamp club meeting this month I had them make card templates.

The idea is to give them something to help them make cards more quickly - they have the template already in front of them, and all they have to do is choose the stamps and card stocks to make the cards.

I've done this a number of times over the years, and the club members tell me they use them all the time.

I try to keep them very simple - when you need a card quickly, you DON'T want complicated!

I have them make them out of white card stock so they've got a clean slate each time they want to duplicate the template - no bias from colors or stamp sets.

Here's the first template.

I give them a sheet of paper with dimensions written down and a visual image of the card.

BUT, I also tell them there's nothing sacred about those dimensions.

What's important is the ratio of all the pieces.

So, even though the top piece on the small layer says 2-1/4 x 3, you could use something that was 2 x 3 or 2-1/2 by 3-1/2 and it would work.

I start a LOT of cards with a scrap of white paper that I've stamped something on - most of the time, I'm using a new set and just want to see the image stamped. From there I build a card.

Something that IS somewhat sacred, though, is the dimensions of the layers. About a year ago I spent one whole post discussing this.

A good rule of thumb is to make each layer smaller in both directions than the one underneath it by 1/4 inch.

So, if the card base is 5-1/2 x 4-1/4, your next layer should be 5-1/4 x 4. And the next layer on top of that would be 5 x 3-3/4.

I also tell them that many times they can change the orientation of the card and the template will still work.

Here are the two samples I worked up using this template.

I used the Filigree background stamp with White Staz-on, and added a piece of Tempting Turquoise that I'd run through an embossing folder.

This could just as easily been a piece of ribbon, if I'd wanted.


And here's the same template oriented the other way:

For this one, I only used one background layer instead of two, and the greeting is larger than the 2-1/4 x 3 that I used on the template.

But it's basically still the same card.


Come back tomorrow for the second template!

Tuesday, May 18, 2010

Riot of Petals (redux)


Remember the Riot of Petals I showed you about a year ago? No?

Well, it's back!

Lookie!

Aren't they beautiful? Japanese Irises. And those flowers last a WHOLE DAY!

So, I take photos when I can, because I haven't figured out their schedule!


And a little while ago, I promised to show you the graduation cards I'd made for my niece-in-law (she graduated from U. of Illionois on 5/15) and HER daughter, who graduates from high school this coming weekend.

So, here they are. The first is the one I made for Maggie:

I know she's received it, because she called the other day to thank me for it.

I used the new Textured Impressions (119976 $7.95) embossing folder from the Summer mini as the background.

For the main image, I used the Watercolor Trio set, also from the Summer mini (117050 $ 22.95 - wood mount and 120084 $16.95 - clear mount).

I colored directly on the stamp with my markers to get this effect. I was actually able to spritz it with water and get several more images before having to re-ink it. Great technique!

And that wonderful scallop punch that was featured in the Occasions mini was used for the top and bottom features.

And guess what! IT'S STILL AVAILABLE! Woo hoo! Want it? CALL ME! I'd be happy to order it for you!

And here's the graduation card I made for Kaitlyn. I'm hoping she's already received it, but don't know that for sure.

I used the Elegant Bouquet embossing folder (115964 $7.95) for hers. I do SO love those embossing folders! They add a lot of class to a card and are SO easy to use!

I used my daubers and colored just the flowers, stems, and leaves.

And then I used the Happy Grad single stamp from the summer mini. Item 117006, $8.95

I like what the stamp says - think it's very appropriate for any graduate. "Happy Graduation Make a Difference - Live the Dream - Relish the Adventure - Conquer the Unknown - Make Your Mark - Stand Strong" Great thoughts for someone who is about to embark into the unknown...

Here's another graduation card I made, but don't have anyone in mind to give it to just yet.

Again, I used an embossing folder for the background and added another piece stamped with the Watercolor Trio set and edged it with the Scallop Punch.

For this one, I added a strip of the Melon Mambo polka dot ribbon, as well.

And the "Happy Graduation" is from the Teeny Tiny Wishes set from the big catalog.

I faked the brads on the greeting by coloring it with a black marker and then applying a little Crystal Effects.


The other night all the Kidz were in the kitchen waiting for me to give them their treats. I seldom get a photo where all three are together AND sitting somewhat still, so let me share!

That's Melie on the top step of the step stool, Velvet on the short step stool, and Mudge on the floor.

Melie usually isn't interested in the treats, unfortunately, but this evening he wanted to be front and center!


So, do you have graduations coming up? Why not call and order the single graduation stamp? It's a small investment and could be used many times. You saw one idea I used it for, but I could come up with lots more!

As a matter of fact, I just found out today that one of the barristas at my Starbucks will be graduating from UCSD this weekend, so I'll need to make a masculine version of a graduation card using it as well. I'll try to remember to post it once I've completed it.

And I'm thinking about putting a Starbucks gift card inside it - LOL

Call me for your stampin' needs!

Friday, May 14, 2010

Random Thoughts and Cards...

Isn't this a pretty card? I used the Greenhouse Garden set that was on special last month.


I wanted this set when I first saw it in the catalog last July, but never got around to obtaining it until it went on sale last month.

I've seen a lot of beautiful cards made with since July, and that just kept whetting my appetite. So I got it!

And this is the only card I've made with it so far!

I used the Finial Press embossing folder for the background. I cut out the flowers and popped them up for some additional dimension.

I added the Chocolate Chip Sending Love Epoxy Brads from the Occasions mini - they're so tiny, they were just perfect to make the flowers look like Black Eyed Susans. And used the Pretty in Pink epoxy brads for the pink flowers.

And for the smaller pink flowers, I applied Crystal Effects to give the centers some dimension.

And, of course, the ever popular (at least with me!) Little Leaf Sizzlets die.

I actually have THREE of this die, because I use it so much, and got tired of running it thru Mr. Big so often. Now I can make these leaves three times as fast!

I'm sure I'll use the Greenhouse Garden set again soon - I've been thinking about doing the Black Magic technique using it, but haven't gotten around to it just yet.

And here's another card I made, probably the same evening, for which I used another group of stamps that I've wanted for a while. And another from which I've made exactly ONE card!


It's made with the Extreme Surfboard stamp as the main image. I used the Extreme Elements (tone on tone) for the background, then took the word stamp from Just Surfing to finish it up. I used the soon-to-be "gone" Bermuda Bay CS as my base.

Since I live in SOCAL, about three miles from the beach (as the crow flies), I've seen my fair share of surfers. Can't say I've ever been tempted to join them though... Just not much of a water person. But I can appreciate watching them!

Tonight I was working on some card templates to teach my stamp club ladies on Saturday.

I make these from all white CS - that way, when you go to use them, you're not biased by the colors on the template and can use any one piece of it to start with and then build from there.

Once I've made the template, I make one or two actual cards using the template layout, to give people the idea of how to transition from the template to a real card.

I have them make full cards for these templates - many times, you can change the orientation of the card and it will still work - but if you only look at it one way, you may not see that. So, for my samples, I try to make a card showing each orientation.

I'll have them each make all three templates, then I'll turn them loose in my stampin' garage to make at least one of the template ideas into a real card. They can use anything in the garage - CS, brads, ribbons, stamps, DSPs - whatever they'd like!

I'll share the templates and sample cards tomorrow evening. And I'll try to remember to take photos of the cards the ladies create from the templates to share with you later.

Thanks for stopping by!


Monday, May 10, 2010

Separation Anxiety

Hope everyone had a great Mother's Day. Even those of us with furry "kids" got in the spirit!

Remember about a week or so ago when I told you about the colors that Stampin' Up! is going to discontinue on July 1, 2010?

Just to refresh your memory, here is a small pictorial - I hope you can read the names ok.


So, this past couple of weeks I've been trying to create, using the new items I've gotten from the Summer mini-catalog.

And I kept inadvertently pulling the Discontinued Colors.

I'm torn with this - do I keep showing you these colors so that you can decide whether or not you need more of something ( card stock, markers, re-inkers, pads, ribbons) before they're no longer available?

Or do I purge my CS of all of these and start showing you only items I've made using the "Carry Over Colors"?

Tonight I decided I would separate the two groups, so that I can make a conscious decision.

I'm still sad to see some of these colors go away. Apricot Appeal has become one of my favorites in the past 5 years.

BUT - I'm excited we're getting some new colors to play with - and I think by my sorting them in a rainbow format, I'll start seeing new color combinations to work with in the future. And I'm excited to see some of the old "In" colors return to our palette.

I found some packets of card stock of some of these colors the other day, have brought them over nearer the "CS pile" so that I'll start remembering I can use them again.

I've received one sheet each of the five new colors, whose names are:
Cherry Cobbler, Daffodil Delight, Cajon Craze, Marina Mist, and Early Espresso.

I'm sure you can figure out they are: red, yellow, rust, light blue, and dark brown.

But having only one sheet of each color doesn't really give me anything to create with. So, until June 1st, when I can order these in quantity, I'll probably be concentrating on trying to use the Carry Over colors.

HOWEVER - that doesn't preclude me from showing items I've already made that used the Discontinued Colors, OK?

That said, here are some photos of a technique I've been playing around with for the past 2 weeks.

This technique is called Black Magic.

You start by stamping a solid image using White Staz-on on to basic black card stock. Here are several I stamped...


After you've let the Staz-on ink dry, you can color over the ink, and the color will adhere!

I played with: watercolor crayons, metallic colored pencils, watercolor pencils, and chalks - every one of these medium worked beautifully!

I decided to use this as the main theme of the Stamp Club at our April meeting, (hi ladies!) and knew that they each already had different tools that might work. So, I used even discontinued tools (watercolor pencils and metallic colored pencils) to show them those could be used, if they had them.

They each give a somewhat different look, but I liked all of them. At this point, it becomes a matter of which you prefer, or have on hand.

Here are several of the images, colored...


This first one was done with the watercolor crayons minus any water.

I also spritzed it with Gold Smooch Spritz. You may be able to see sprinkles of in on the black card stock. It's available in the Summer mini and comes in 4 different colors.

That was fun to play with, too! And I managed to get it all over everything! LOL I guess you're supposed to confirm WHICH WAY the nozzle is pointed BEFORE you spray!! {grin}


This one was done with the Chalks.

I felt a little more in control with the watercolor crayons, but I have to admit, the chalk one came out quite beautifully! I used Q-tips to apply the chalks, just like we've been doing for years.

After I finished the technique I layered several colors of card stock, and added a bow.


I've been playing around with the burnishing technique as well, and will post some more photos of those samples in the future.

I used items from the Summer mini for a couple of graduation cards I made over the weekend, but I'm not going to show them to you for about a week. I want to make sure the recipients receive them before I unveil them to you.

So, what have YOU been stamping lately? Have you seen something in the Summer mini-catalog that you just HAVE to have? Let me know!


Saturday, May 8, 2010

A Neat New (?) Technique

Hi again!

Tonight I'm going to show you some cards I made using a technique Jan Tink has dubbed "Burnishing".

I know I've done this before (years ago!) and we didn't call it burnishing then, but it's a fun technique, and gives you quite lovely cards! Doncha think?


You'll need an outline stamp set to do this technique justice. I'm using Awash with Flowers, which everyone was able to purchase during April.

But never fear, if you didn't purchase it then, it'll be back in the new catalog come July 1st. In the meantime, I hope to whet your whistle to purchase it then by showing you some awesome things to do with it!

You start this technique by stamping the outline stamps in black Staz-on ink. You want an ink that's not going to be picked up and moved when you get to step 2 of the process.

Here's one of the ideas I came up with:

You just want to create the outline of the images you want to add the technique to...

Next, you need some of our daubers.

You will pounce the dauber on the ink pad, then start rubbing the dauber inside the flower of your choice.

Keep rubbing, re-ink the dauber - keep rubbing until you get the color you like! The rubbing is the burnishing technique.

And then pick up a coordinating color and use it to highlight. Keep coloring your flowers (or whatever image you've chosen) until you're happy with the effects.

Here's another card I made using the Awash with Flowers set and the burnishing technique. Each and every card you make with this technique will be different - you'll stamp the images differently, or color them a little differently. And it's addicting!


Isn't this lovely?

I've used a large number of colors here in order to achieve the shading I wanted. Don't be afraid to experiment!


So, do you want to try this? Do! And let me know how much you enjoyed it by posting a photo in the comments section. I LOVE COMMENTS!

Happy stampin'

Friday, May 7, 2010

It's FINISHED!

The patio!

WOO HOO!

And it's beautiful!

It's been the subject of my attention for the past 2-3 weeks - and I apologize for not posting for so long. I actually didn't get much stamping done for that period either, but have a few things to share in the upcoming days. Stay tuned...

In the meantime, how about a few photos of the patio process?

The Kidz had inspection duty every evening after the "crew" left - and they were fascinated over the numerous changes every day...

First everything had to be taken OFF the patio - here's Melie running away from all the plants under the sunshade.


And here is everyone inspecting the evening after the concrete was jackhammered up.

It looked like a tornado had hit back there!

Of course, they all had to check EVERYTHING!


After the concrete was hauled away, the crew had to layer gravel. Pavers will be installed...

Here are Mudge and Velvet, inspecting THAT aspect of the job.


Next came the layer of sand (notice the paw prints left over from the catspection of the previous night.

And then the pavers were laid.

After that, sand was swept over top so some could settle between the pavers. And after THAT, a vibe machine was used to pack more sand. It was noisy a couple of days last weekend!


Here's a wider view - the cat prints are on the right side...


And here's Mudge, giving the finished paving job her approval - rolling around on it to make sure it's at least as good (if not better than) as the cement we used to have!


Here's Aaron, helping Craig set the poles for the roof.

I'm not sure my back yard is EVER going to recover from all this.


Here are Melie and Mudge checking out the saw the guys used to cut the roof pieces...

Of course, they NEVER went out for inspection duty until AFTER the guys left every evening. Can't have the crew knowing the inspectors have been there, ya know!


Now I wonder whose legs those might be?

They would be Craig's...

And who is sitting on the boxes from the storage shed that's next on the list?

That would be Aaron.

Craig's putting the finishing touches on the patio cover.


And here's MUDGE inspecting the roof from the top...

I think she was up there before Melie - and that used to be one of his favorite places in the whole wide world!


And the final item to be added to the backyard (for now, at least!) is my storage shed.

The hope is that this little building will hold a lot of the "stuff" that's currently cluttering up the garage.

If and when I get to the garage project (again - you may remember my muttering under my breath when I tackled it last year about this time) there'll be lots of photos of that mess, too.

But, for now, the next thing on the list, after Craig gets back from his daughter's graduation from college (and assuming he doesn't get a REAL job), is the master bathroom.

So, it's time for me to think about paint colors, and vanity styles, and tile colors (white or ivory?). I have about a week before I'll need to have feelings one way or another about any of that stuff, though, so hopefully, I'll be able to show you some of the things I've been STAMPING lately.

Til I do, I hope YOU'VE been stamping!