Tuesday, December 29, 2009

Pinks & Reds

There was a time when it simply was NOT acceptable to put pinks and reds together.

I remember, because when I was in eighth grade I found a very feminine suit that was a hot pink and red paisley pattern, and I'd never seen those two colors together before.

I just fell in love with that suit. I know most of the reason was the color combo - guess I was a rebel even back then!

It was very expensive at the time - but this suit I HAD to have, and so I put it on lay-away, (remember that?) and bought it.

I wore it all through high school and even into college. And then hemlines went back down, the suit was no longer "fashionable", because I couldn't lengthen the hem!

Who knows what might have happened to it. I wish I had it now - I would never fit into it, but I do have such fond memories of that outfit.

I'm so glad that's no longer true that you shouldn't put pinks and reds together, because I love them together - assuming they are the right shades of each one.

Here's what I've been playing with the past couple of evenings...


Real Red, Regal Rose, and Pretty In Pink CSs.

I've used the new Pinking Hearts border punch to make the "ribbon" on the left side of the card, and the Heart and butterfly embosslits to add dimension.

I've also used some of the Sending Love Specialty paper.


I used the same colors of CS for this card, and added Chocolate Chip to the mix.

This time I used the new Extra Large Two Step Bird punch, as well as the Heart embosslit.

I also used the Scallop Border punch on the Choc. Chip CS, then glued another ribbon onto that one. Isn't the punch beatiful?

And did you know? It's available as a Sale-A-Bration gift this year! WOO HOO!


And for this one, I used a different pattern from the Sending Love Specialty paper. It has GLITTER on it!

I am SO not a glitter fan, but this paper is beautiful - and the glitter doesn't seem to come off on my hands and end up on my face or in my eye.

I used all but the largest butterfly from that embosslit, as well as the heart embosslit, and the Window and Modern Label punches. The words are from Teeny Tiny Wishes.


I'm considering these three cards as candidates for a shoebox swap I'll be in at Leadership early next month. Would love some feedback - which one do you like best?

Leave me a comment and tell me what you think!


Monday, December 28, 2009

This N That

I hope you all had a wonderful Christmas! And that Santa brought you everything you need - except for those stamps of course! LOL

My Christmas was filled with visits to friends' homes. Small gatherings, but fun.

I have a couple more cards to share, then I'll put Christmas away and concentrate on STUFF FROM THE NEW OCCASIONS mini-catalog!

This is one of those cards that came together because all the pieces were lying out on the table together.

It's a conglomeration of sets - I'm not even sure I can name them all!

Let's see, I used a discontinued jumbo roller stamp for the background on the kraft CS. I tend to keep those jumbo rollers because they cover a lot of territory in a hurry.

I used a lot of them to make my wrapping paper this year - of course I didn't take photos of the gifts before I mailed them/gave them away!

And, no, it seems, without a lot of research, I won't be able to name all those sets! Can you?

This is another one that just fell together.


More pieces that were lying around on the tables in the Stampin' Garage.


And here's a photo of those rascally Kids, sitting on the step stool in the kitchen.


These may be the last photos you'll see for a while - can't find the camera! Know I used it for these photos, and it seems to me I took a few others that I haven't uploaded, but I've been searching the house (and the garage, and the car) for two days, and can't find it!

It'll pop up somewhere, but I just hope it's SOON! It's driving me nuts!


So, are you ready for the Occasions mini-catalog? I'm ready for you to have it! I've been playing with a lot of the items from it, and can't wait to share what I come up with...

In the meantime, if there's anything you need from the Holiday mini-catalog, you only have 5 days left to place those orders! On-line, with me as a demonstrator (you'll get the items at a better price), or give me a call and let me know what you need.

Happy stampin'!

Thursday, December 24, 2009

VINYL!

YES! We are now selling the VINYL we make the Decor Elements with as individual entities!

At Convention last year I chatted with one of the Stampin' Up! employees who was in the Decor Elements display area, and mentioned that I'd love to be able to purchase the vinyl for my personal use.

At the time, we were only carrying Decor Elements in white, black, brown, and, in some instances, red.

Well, I wanted more colors than that, and mentioned it to the gal while we chatted. In the mini-catalog that was released in July, we began carrying OTHER colors for some of the product! I told her I wanted THOSE colors, as well...

I also emailed my suggestion - just a few weeks ago. And, LO and behold, they showed up on the Twelve Days of Christmas list.

I've decided I must be psychic!

I was ecstatic!

So, you ask yourself, what the heck is she going to do with all this vinyl?

Look!


I just got the Tulipe die, so my first attempt at using the vinyl was to cut Gable Green vinyl on the Tulipe die.

This is a pretty intricate die, so I chose to use the negative design - simply because I felt it might be easier to apply.

Well, it took some time. I had to work out the bubbles, and at the bottom, I did have a little trouble working out the wrinkles. So, I just cut the vinyl, and overlapped it a tad. I will probably go back tomorrow and snip just a TEENY TINY piece out of that overlap area so it sits flat. And the next time, I may cut just a SLIVER out of the cut pattern before applying.

But, all in all, I thought it came out pretty well.

And then I got the scathingly brilliant idea (Trouble with Angels, anyone?) to cut a couple of small pieces of the Pixie Pink vinyl and run it thru the new butterfly embosslit! I decided to try the new polka dot Heart embosslit as well.

Look!


These are really slick! I cut more butterflies, just so I wouldn't waste the vinyl.

And then I decided maybe they'd look pretty good on the glass block with the Tulipe die.

I haven't applied all the butterflies yet. They're in the "mulling" stage.

I realize I COULD remove them if I didn't like how they looked, but I think I'll just let this sit overnight and I'll look at again tomorrow to see how I want to finish it.


But isn't this KOOL!!??!


So many Big Shot dies, so much vinyl - I need more ideas of what to decorate! Got any you'd like to share with me? Leave me a Comment!

Wednesday, December 23, 2009

Gift Tags

Finally got all the packages wrapped and on their way to Illinois. Now to think about local people...

And remember last time, I said I was making gift tags. Here are some I made up the other day.


These were made with the Two Tags die and the new Vintage Vogue set that you'll be able to purchase on January 5, 2010. The other pieces from that die are long gone on some other project.

These were made from punches!


Aren't they adorable! I totally CASEd them from this awesome demonstrator by the name of Ellen Kemper. She's "da bomb" when it comes to having that eye for seeing shapes and how they'll go together to create some other object.

Both became gift cards for my great-nieces. Had planned to make a different one for each person's gift card, but just ran out of both steam and TIME, so the kids were the only ones to get them.

Are you ready yet? For Christmas.

Don't forget - stamping is a GREAT stress reliever!

Friday, December 18, 2009

SHH - Sneak Peek!

What the heck is THAT, you ask!

Well, it's a sneak peek from the Occasions mini-catalog, which, if you're a customer of mine, you will probably receive the week between Christmas and New Years...

If you're not one of my customers, why not? Just go to my website and place and order, and you will be!

So, anyway, what IS that in that photo, anyway?

ANSWER:

butterflies! LOTS of them - in all different sizes and colors! And they have texture! Made with one of our newest embosslits!

There are 4 different (small to tiny!) sized butterflies in this embosslit, and each one of them has a different texture to it. I can't wait to start playing with these things!

Come back later (after I've finished getting Christmas packages wrapped, decorated, and IN the mail), and I'll show you what sort of ideas I came up with for these pretty lil things!


These, you can probably figure out.

Yep, birds, wings, and branches...

All from ONE PUNCH! (OK - technically, two punches, because I punched the same thing twice).

How cool is this?

I'm displaying them on a quarter sheet of card stock, just so you can get some sort of reference as to their sizes.

Remember I told you I'd been playing with my Spectrum pads and the brayer - I brayered a number of sheets of card stock specifically so I could play with this bird punch and the butterfly embosslit.

And here's a card I whipped up using the bird punch, the new scalloped punches and the New Year's stamp (A Brand New Year Item #116838) on page 31 in the Holiday mini-catalog.

Isn't he a cute little bird?

And he looks totally different if you face his wings down, instead of up like they are on this card...

I'm sure I'll be making lots of things using this punch...

And did I mention? When you're done with our new punches, you can lock them closed so they take up less space in your craft cupboard! Fantastic idea!


If there's something you really want from the Holiday mini-catalog, you'd better hurry - it expires on January 4th, 2010...

And while you're at it, check out The Twelve Days of Christmas sale that Stampin' Up! has right now. Lots of Big Shot items, all the way from embosslits to dies, to colored vinyl you'll be able to use WITH Mr. Big!

Got all your Christmas gifts made yet? How about your gift tags? That's where I am these days - making the tags...

Thursday, December 17, 2009

Decor Elements Ideas

I think most people look at our Decor Elements and think they can only be used on walls.

I'm here to tell you - NOT TRUE!

As a matter of fact, I've only put one or two of these on my walls. The rest I've used to decorate much smaller items.

Let me show you...

Here's a Charger plate (I have NO IDEA why they call them that, so please don't ask...) that I found at a local department store in their $1 section - there were actually two in the package, but I've only decorated one so far.


And here's a mirror that I decorated. I was trying to take a photo of it while holding Melie.

Do you know how hard it is to take a picture of a mirror without getting yourself in the photo? Nearly impossible! But Melie - well, he's another subject - he's allowed to be in as many photos as he looks good.


And here is a serving tray that I found in the local $1 store. It's not easy to take photos of reflective surfaces! LOL


I've still got my thinking cap on about where else I can use these for home decor. Off the top of my head: tiles, picture frames, glass blocks, bulletin boards, chalkboards...

And, don't forget - this week Stampin' Up! has the Twelve Days of Christmas specials in effect and you can buy the vinyl in about 18 colors! I'm so excited about this.

Stay tuned after Christmas, and I'll be using this vinyl with my Big Shot dies - who KNOWS what I might come up with!

Wednesday, December 16, 2009

Decorating Candles

For stamp club this month, we were going to decorate candles. "Were" is the operative word here...

But, we also had a Pot Luck planned. So we all sat around chatting and munching, and pretty soon, it was time for some to take off for other obligations - and we'd done NO STAMPING!

They said it was OK, that they'd really enjoyed the day, even if we didn't stamp. I felt a little like I'd let them down, but they insisted it was OK.

They had a chance to get to know each other better. We have two new ladies to our group this year, and they've been a wonderful addition.

Most of the rest of the club members have been in club at least 5 years (thanks, gals! I appreciate you more than you'll ever know!), so have already formed a bond.

I'm sure Justine and Ruth (aliases, but they'll know who they are!) have felt a little out of sync with the rest of them, but know a bond was formed on Saturday that will last the rest of club. Hopefully, they'll decide to join us again next year.

We all got to know more about each other - families, children, pets, interests. All those things that draw us to each other.

Justine & Ruth are both more scrapbookers, than stampers, so there's a lot of new territory to cover for them. I've been trying to plan club meetings this year as a re-education for my long-timers, as well as introducing new ideas to the "newbies".

But I digress - back to the candles of the today's blog subject !

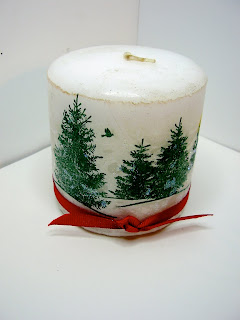
Here are a couple I whipped up as samples for everyone. I've made these countless times over the years, but they make such great gifts, I couldn't find any at all, and had to create new samples!

This one is a short white candle that I picked up at a local dollar-type store. This year they cost $4 each, but when I first started decorating them, they were $1. Inflation!


I stamped on white tissue paper, and melted the tissue right into the wax of the candle, using the heat gun. It doesn't take much time at all.

The biggest thing to remember is to turn the heat gun off every once in a while and roll the candle onto your scrap paper to round it out while the wax is setting. Then heat a little more and repeat the process.

I used Scenic Season stamp set and Handsome Hunter ink. Then I added a red grosgrain ribbon to finish it off.

When I get ready to give it as a gift, I'll put it into a clear cello bag, add a gift tag, and add more ribbon to close the bag.

This is the simplest candle I think I've ever made, but I like it a lot, because of its simplicity.

And this is candle I had in my stash - but the only one, so decided I'd use it as a sample, too, so they'd get an idea of how other shapes and sizes looked when completed.

I brayered the tissue with a Spectrum pad that I'd made using Stampin' Up! inks. For this pad I used Real Red, Pumpkin Pie, Only Orange, Apricot Appeal, and YoYo Yellow.

If you can find un-inked Spectrum pads (we used to carry them but don't any longer), you can make your own color combination using our re-inkers! I also have homemade pads in pink combos and blue combos.

The candle was so tall I had to turn the paper 180 degrees and brayer again, so that I'd get it all covered with ink, and not transition blatantly from YoYo to Real Red - too hard on the eyeballs!

After I brayered the tissue, I embossed with gold embossing powder and the Bella Toile background stamp.

Then I melted the stamped/embossed tissue into the candle, making sure to pull it against the candle tightly as the wax melted.

Once that was done, it looked OK, but seemed to be missing something, so I dug through my stash of already cut Big Shot dies and found the flowers that are on it.

And to finish it, I added some gold ribbon that we used to carry.

This candle is about 6 or 7 inches tall, whereas the candle with the tree scene is only 4 inches tall.

Here's my "lion king" lounging on the chair in the computer room the other day. He's so handsome! sigh..


Don't forget about The Twelve Days of Christmas specials that SU is offering until December 24th! Go here to see everything. It's Big Shot oriented product, and I've already got a list of things I'm going to HAVE to have!

Let me know what YOU HAVE to have, and I'll be glad to place an order for you.

OH - and, it's time to book those workshops for Sale-A-Bration - YES, it's THAT time of the year again, already!

Call me!

Monday, December 14, 2009

Annual Christmas Luncheon


Our local demonstrator group (AKA the Get-together Group) had its annual Christmas luncheon today.

We've done this every December for, I don't know how many years - maybe close to ten now... It's a reason to sit around and chat about Stampin' Up! and to exchange hand made gifts, which must contain some Stampin' Up! product.

We use the Chinese Gift Exchange concept - i.e., we draw numbers, and then select a gift from the table in that order.

Number One can only select an unopened gift, but Numbers Two and beyond get the opportunity to steal an already opened gift, if they want. We do limit the "steals" to two per gift...

Here's a photo of the unopened gifts:


We had an awesome experience this year - Teresa's SON asked if he could come along and participate in the gift exchange! Of course, we all said YES! Here are he and his mom:


One of the other demos has a teen-aged daughter, Olivia, who was about nine months old when Sandy signed up, so she has been attending our events for quite a few years. Now she participates, too! And, if she hadn't been busy being Clara in The Nutcracker today, she'd been looking forward to joining us this year. Sandy said she's been planning what she was going to make for quite some time, so she was disappointed that she couldn't attend.

I think that says a lot about our stamping businesses, don't you? To have our children ask to attend our functions! I'm so pleased to know that we may have two potential second-generation stampers in our midst!

And, oh by the way - Luis's gift, which I chose, but which was stolen from me, was very impressive! He made a box and had 6 full cards and decorated envelopes in it. Unfortunately, I didn't get a great photo of it, but here's what I did get:


And check out the gift tag - he made the Santa out of punches - do you think he's been watching Mom for a while?


Here are some photos of the other gifts:


After we exchanged our gifts and had our fill at the buffet, everyone trouped over to my stampin' garage so they could all play with my new toys from the Occasions and Sale-A-Bration catalogs. Of course, their wish lists grew after seeing all my goodies!

I took a few minutes to play with those goodies late tonight, but mostly I went thru everything deciding what will work with what, and making my first embosslits and embossing folder samples. More to come, soon, I'm sure!

OH - Stampin' Up! is offering their version of The Twelve Days of Christmas - all Big Shot oriented, but everything is marked down about 25%.

ANNNNDDDDD - we're now offering the vinyl that our Decor Elements are made from in single sheets - Real Red, Pumpkin Pie, Gable Green, So Saffron - there are 18 colors, in addition to black, gray, brown, and white!

OMG - my mind is awhirl with possibilities for Mr. Big and all the things I'll be able to cut and use to decorate things!

Go HERE to see that list - and put through an order! Or, if you'd prefer, give me a call or an email, and I'll be happy to order your items for you.

Stampin' Up! has told us that they won't guarantee any orders received after December 15th will be delivered by Christmas, but since I'm in San Diego, I can probably place orders a day or two later and still receive it in time for gift giving.

Let me know how I can help you!

Tuesday, December 8, 2009

Christmas Card Stamp A Stack

My 2009 Christmas Stamp A Stack has come and gone.

It took me forever, but I finally made up my mind which cards I would have the attendees make.

This was the favorite, with the others in no particular order.


At the last minute, a woman called and said her 11 year old daughter wanted to attend. The cards had been designed for adults, so I came up with a card I thought might appeal more to her - and I was right! This was the first card she wanted to make. She did an excellent job on all the cards she made - and she'd never stamped before Sunday afternoon!


The Kidz were all together on the patio the other evening. Their being all at the same place at the same time is a really rare occasion, so I took photos.
This is the best one.


Thanks for stopping by - hope you found something you liked!

Thursday, December 3, 2009

And yet MORE...

... gift card holders! I had someone from Curves ask for eight. She was a great customer for them last year, so I gladly obliged.

I asked if I could make them all the same. It takes a LOT less time to make multiples of something than to create each one individually. She said, no, she'd like them different. So, they are - on the outside!

I used the same rollerstamp on the inside of all of them. I also used the tag and small tag punches (1-1/4 and 1-3/8) for the "To" & "From" areas inside. I just cut the larger punch out of cardstock that appropriately matched the outside.


One final reminder about my Christmas Card Stamp A Stack on Saturday and Sunday (12/5 and 12/6)!

At this point, I'll need you to call or email me to sign up for the class. I'll be busily cutting CS and packing supplies tomorrow and Friday, so I'll be ready early on Saturday AM (10, to be exact!). And Sunday's session starts at 1 PM.

So, the other day, I worked in my flower bed, getting it ready so I could sow this year's wildflower seeds. The Kidz have been enjoying it as the largest litter box in the world, so I had quite a bit of work to do before it was ready.

Here's a before photo:
Those are California poppies growing in there. They've survived the entire year and seeded themselves down. I LOVE CA poppies - they're so cheerful... So, they'll stay, and I'll seed around them.

Don't know if you remember or not, but this year's wildflowers grew VERY tall - the bachelor buttons were waist high! Who knows what this year's garden will bring - that's what I love about wild flowers - one never knows what will grow.


And here's an "after" photo.

I got the seeds sown, and tonight when I was out watering, I noticed CAT PRINTS running right thru the middle! Oh, and of course, a pile of dirt. *I* had leveled it off before planting.


Anyone have a fail safe idea for keeping them out of there? Would love to hear it, if you do!

And finally, here's a photo of the two of them lounging in the backyard while I slaved away cleaning up after them! (oh, and I'm sure Velvet contributed, too!)


Yes, that's a toilet that Smedley's sitting on. Had my old ones replaced earlier this year, and haven't done a "dump run" to get rid of the old ones yet.


I've been giving serious thought to turning them into planters! What do YOU think? Leave me a comment and let me know - oh, and if you have some photos you can share, showing me what others have done, I'd love it!

Happy stampin'!