Wednesday, January 19, 2011

Tools - Clear Block Carrier

Hi again!

I was using my clear blocks to stamp thank you cards for my stamp club members tonight and remembered that I'd taken photos of the holder to show you, so I thought I'd share those with you tonight.

It's very difficult to tell how the block holder works from the picture in the catalog. It's a GREAT tool! Look!

Here's the inside as you receive the carrier. You need to punch out the foam in order to insert the actual blocks. The outlines are barely visible, but I think you can see them here.


Here the foam has been removed and the clear blocks inserted. And, look! They've even given us a foam piece to fit between the two sides of the carrier to keep the blocks from scratching each other! They've thought of everything!


And here's the outside. A very sturdy snap holds the carrier closed. It's very easy to carry!

This carrier will accommodate one each of every size block (A thru I) we carry. They're snug when inserted into the foam holders, too, so they won't fall out!

You can find the blocks and the carrier on page 192 in the big catalog. The blocks can be purchased individually, or as a set.

The carrier is small and compact, and easy to tote around, if you so desire.

It's great to have a place to accumulate and carry all the blocks, and not have to worry about losing any of them. Since they are clear, it's easy to lose them anywhere! Most especially on my work bench - ha ha...

Be sure to check it out! If you NEED one, give me a holler!

Tuesday, January 18, 2011

PEEP!

How are you???

Yes, I'm back - FINALLY!

Life takes us on journeys sometimes and occasionally we lose our way back.

If you've followed me for a while (and it's been QUITE a while since my last post) you may remember that I was having my kitchen remodeled.

I think my last post showed the "sorta" finished kitchen - well, Dr. Destructo's part of the remodel was finished, but mine wasn't. So, I got off on that tangent, finished putting up my cherry and rooster items and then decided it was time to get more active in the garage remodeling.

I was fortunate enough to have several friends (Hi Bern & Anne) volunteer to help me - and I needed it!

I can get on "overwhelm" very easily - too much to do - where DO you start?

So, Bernadette and Anne came down several times and helped just by clearing some of the clutter. I still have the POD in the driveway, so we started stashing the retired stamps and accessories out there so we could get a handle on the things I needed to re-arrange in order to find them and organize them better.

The garage is NOT finished yet, but it HAS been painted - a lovely shade of peach. That was due to the grandson of my friend Susan (thanks Jacob!). He was awesome - he painted the whole thing in three days - moved all the heavy stuff into the middle of the room and then re-taped plaster board and painted. It took two coats of primer and two coats of peach to cover the turquoise that I've been looking at for the past 20 years.

And in moving that stuff into the center and then moving it back to the walls not ONE THING got broken - and he didn't take the time to move much off the benches etc. before moving them!

Wanna see?

This is the color I've been looking at for over 20 years. I'm sure it was lovely when it was first painted. The husband of the couple who owned the house before me used to work on cars in this garage and Jake had his work cut out for him to paint ANYTHING over the greasy handprints that had been left on the walls over time (probably some of mine, as well!).

And here is the color it is today:

MUCH better, wouldn't you say? I really like it. The old paint was flat. This is semi-gloss. I don't think I'd ever paint with flat paint - I like the semi-gloss because it throws more light - and in a two-car garage with very little lighting, you NEED more light!


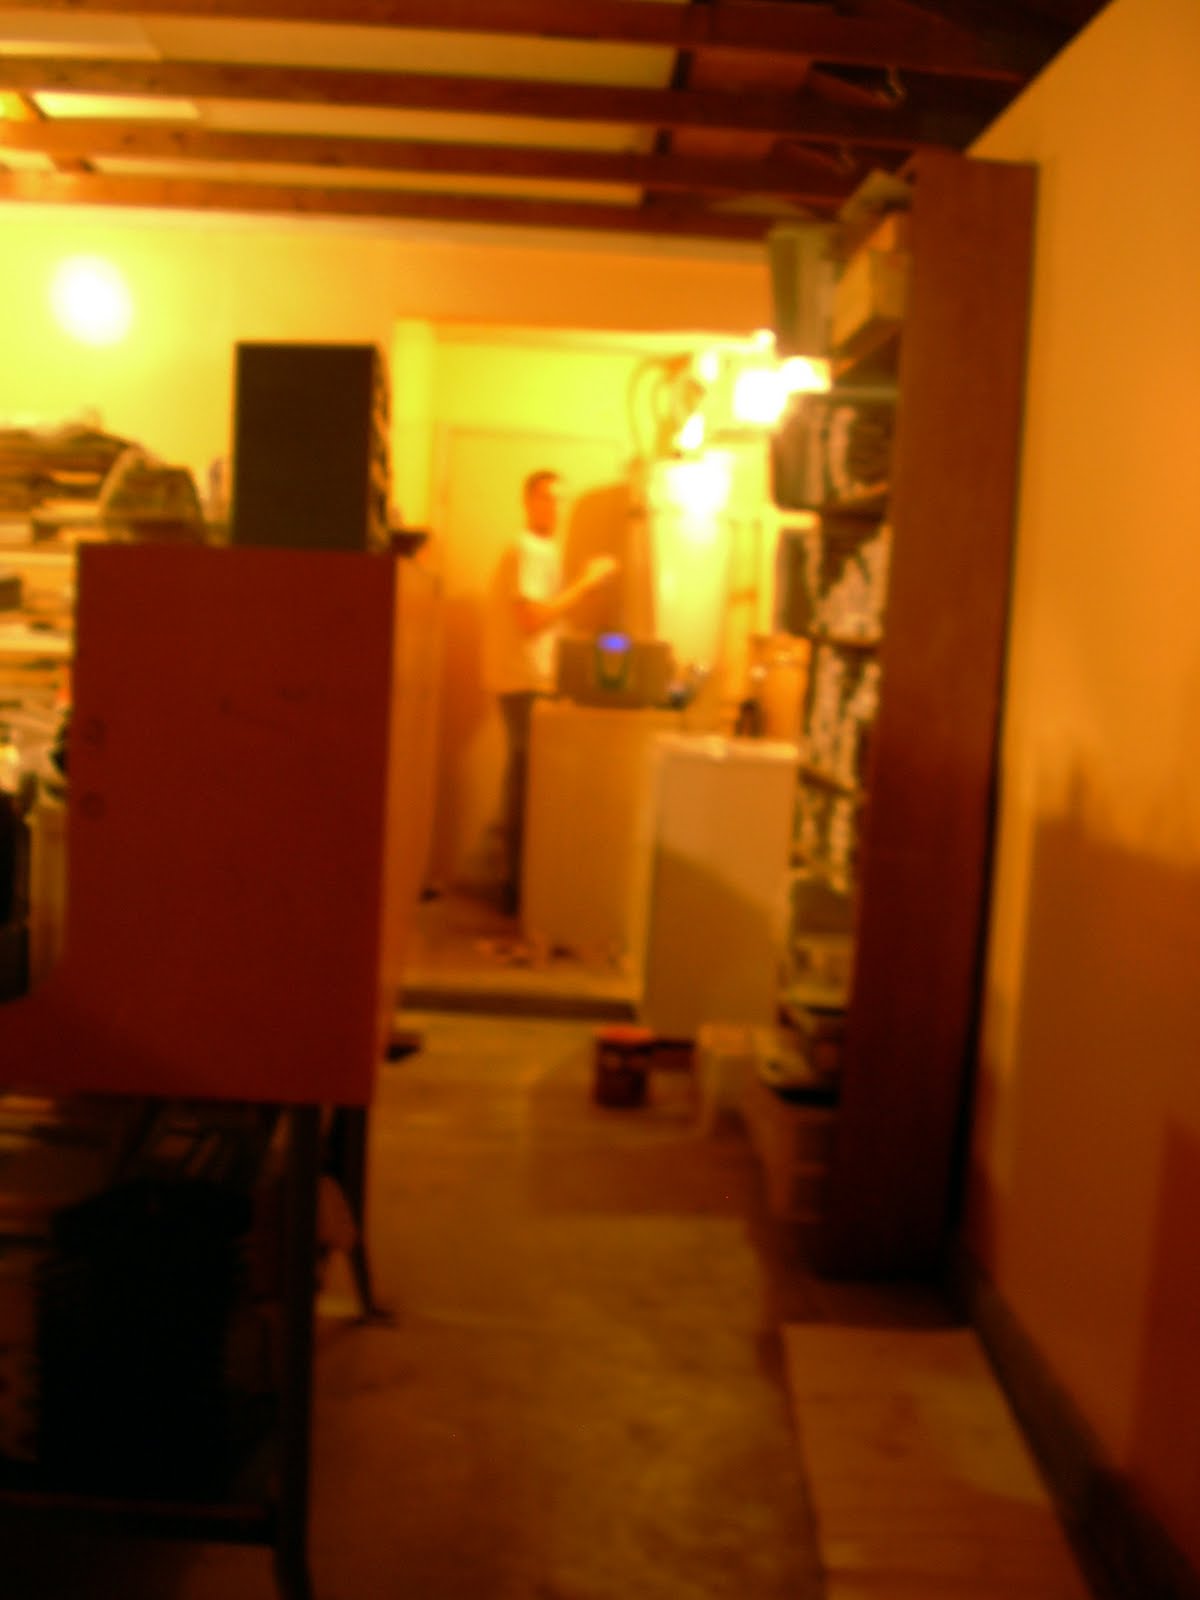
If you look closely, you can see Jake standing back in the doorway.

Great kid! Good worker, very conscientious - he did a great job for me.

That's my workbench over to the left. That thing weighs a TON and isn't all "glued" together, so it took some doing to move it out from the wall and then back again, without any mishaps.

Here's another view while everything was moved into the middle of the room.

I've gotten some of the Definitely Decorative wall decorations to put up out there, but I haven't finished moving things around enough yet to feel comfortable to put them up.

I got the "Create", "Inspire" and "Share" definitions from the Definitely Decorative catalog, along with the Manhattan flowers collection.

I had the "Create" and Manhattan flowers on the walls before. Since they're vinyl, I debated whether they could be painted over (and maybe resist the paint), but in the end, we decided we'd better remove them, and THEN paint.

They were very easily removed! The flowers came off in about a minute each. The "Create" is made up of quite a few words and had to be removed a letter at a time - that probably took us about 15 minutes.

So, if you've been holding back getting some of these awesome designs because you were afraid you might have trouble getting them off, have no fear - go ahead - put them on your walls, mirrors, doors - whatever! When you're ready to change them out, they can be very easily removed!

Don't have one of the Definitely Decorative catalogs? Leave me a comment or email me and I'll be happy to get one to you!

Well, I'm going to sign off for tonight - don't want to tell you EVERYTHING that's been going on in the past 6 months all at once, you know!

Come back! Next time I promise to show you something that I've stamped while I wasn't posting to my blog.

In the meantime - don't forget Sell-A-Bration (SAB) starts January 25th! For each $50 in product you purchase you can select something from the SAB catalog FOR FREE!

And this year, for the first time, you can select items other than stamps! There's a bundle that has ribbon and buttons in it, another that has die-cut adhesives and Designer paper in it. There's even a Definitely Decorative item that you can get this year!

Thanks for stopping by!

Sunday, August 8, 2010

After Photos - Kitchen!

I forgot I'd promised to show you the kitchen after I'd personalized it!

I'm SO HAPPY with my new kitchen. NOW - don't think just because I got a new kitchen that I'm going to turn into a Julia Childs! While she was one of my mom's heros, I've never been that drawn to cooking.

Not that I can't, but it's not on the top of my "I want to do that" list. My mom loved to experiment in the kitchen. As kids, my brother and I were FORCED to try new foods almost every day. And we HAD to eat at least three bites of everything on our plates. There were times when I sat at that table for a LONG TIME after everyone else got to leave. It was pure torture, living at our house, I tell ya!

Anyway, I digress. Here are some photos for your entertainment.

Here's the "sterile" version...


And here's the more personalized kitchen that we're living in these days.


Oh, and I can't forget to share with you a couple photos of The Kidz as I unpacked the cherry items for the tops of the cabinets! They couldn't figure out WHAT was going on, but, of course, they had to check it out!


One of these days I'll remember to take photos of both bathrooms, now that they're finished, so I can share those with you as well.

Hope you've been using those stamps. I promise, I'll get some stampin' samples posted on here soon!

Saturday, August 7, 2010

The Temple

The Temple was a busy place for weddings while we were there. We saw at least two different brides making their way to the door while we strolled around.

While we were there, Utahns (?) were getting ready to celebrate Pioneer Days - the day they became a state. There is a parade each year, and I took photos of some of the floats, which I will share with you soon.

I'm assuming it's considered good luck to get married around Pioneer Days, and that's why there was a "rush" of weddings - but I could be wrong!

Anyway, I watched this couple getting ready to pose for their photographer and their precious wedding photos, and I just KNEW the bride was going to fall into the pool. What do you think? Did she get that beautiful dress wet?


I don't really know the answer to my question - I was on the other side of the pool, using my telephoto lens, and was just happy I got a half-way decent photo!

The sun was setting, so lighting was a bit of a problem. I've touched up this photo below (and maybe I shouldn't have! Not the best photo of me I've ever had taken) because it was past sunset when Susan took it. I'm sure her camera captured a much better one, but I forgot to ask her to email it to me, so this one will have to do.


That's the temple in the background. Quite a striking building, isn't it?


I'm glad we took the time to see some of Salt Lake while there this year. We had to give up some Convention time in order to do it, but it was a nice break for us.

Want to go to Stampin' Up! annual Convention? Join my 'we StAMp everything' team and you'l be invited!

We have so much fun while we're there!

Thanks for stoppin' by...

Friday, August 6, 2010

Salt Lake City

Our Stampin' Up! conventions are held most years in Salt Lake City, UT. I've been there numerous times, and most of the time, we're so busy with swaps, and classes and just chit-chatting, that I don't even go anywhere except our hotel and the convention center.

But this year, after a particularly excellent (but very filling) meal, Susan and I decided we needed to walk some of it off. Our hotel is right across the street from the Temple, and someone told us the gardens there were very lovely.

So, we decided to take a stroll and check it out. And they were correct!


This little guy was having a wonderful time running around and ran for this pool as I stood there taking pix of the flowers - so I asked his mom to pose with him for me.


And here's a closer view of the pool itself

Isn't it lovely, too?


More photos of the Temple grounds to follow - wait til you see the hollyhocks they grow there!

Hope you're stampin'! Call me if you want a stampin' buddy!

Thursday, August 5, 2010

More Sweet Shoppe Photos

I still have lots of photos of The Sweet Shoppe display to share with you, so without further ado...


Aren't these cookies yummy looking?


And how about these strawberries!!?


They look good enough to eat, too!


Candy! All made with dowel rods, card stock and ribbon!

In the background, you can see that they've also filled little dessert dishes with brads, buttons and other bling - all color coordinated!


There was a display for each of our Core Colors - that's FORTY different displays!


And, finally (for tonight at least) some candy bars -- there actually WERE candy bars inside these lovely items!


I would love to teach you how to make some of these beautiful things - think of how lovely they'd be as a centerpiece for a Thanksgiving or Christmas party!

Call me to book a workshop, and I'll be happy to show you those that I've figured out (or SU has given us directions for).

In the meantime, STAMP SOMETHING! And have fun while you're doin' it!

Wednesday, August 4, 2010

WOW Great Hostess Bennies During August!

Stampin' Up! has announced some awesome Hostess benefits for $350 (or greater!) workshops that close by August 31, 2010!

AN ADDITIONAL $25 IN HOSTESS BENEFITS! How awesome is THAT?

So, dig out that catalog (you don't HAVE one, you say? Well, give me a holler and I'd be happy to get you one!) and gather your friends - and get enough orders for that $350 workshop!

Or better yet, give me a call and let me come to your house with my goodies and we can PLAY! You, as Hostess, will earn those freebies for that $350 workshop and we'll all have fun in the meantime!

=====

Convention has come and gone. I always get so pumped while there and want to try EVERYTHING I hear about - but then I get home and reality sets in, and I realize I need to focus on one or two items and not try to do it all!

I'd love to get back in touch with you again, if you've been a customer in the past - give me a call! I'll be trying to reach you, too, so if you get a voice mail from me, I hope you'll take the time to get back with me so we can catch up.

I'll be sending out some RAK cards, too. What's an RAK card, you ask? It's a Random Act of Kindness card. I've been busily creating some with new stamp sets and inks and papers and will be mailing some out soon. Watch your mailbox - maybe you'll be one of the lucky ones!

How about a few photos from convention?

There was one exhibit this year that just knocked my sox off! It was called "The Sweet Shoppe" and it was GORGEOUS!

I know my photos aren't going to do it justice, but here are just a few to whet your appetite...

This is one of the displays - there were about 10 of them and each and every one of them was just breathtaking!

I happened to be there during a class (shh - don't tell anyone, but it was right after lunch and I just couldn't sit in that chair and stay awake anymore! LOL)

So, Susan and I stopped by The Sweet Shoppe when it wasn't so crowded.

Here are a few of the items in a closer view. Remember, EVERYTHING was made with Stampin' Up! products!

Don't these look good enough to eat?

I'll show a few of the trays in a closer view, so you can get a better idea of how the items were made.

I'm hoping SU will post some directions for us on specifically how they made some of the items - helps me not have to think so hard! he he


Don't these look good enough to eat?

The tray of brown 'candies' actually consists of boxes made with cardstock and decorated with buttons, ribbons, and other bling. Notice the ribbon roses on the top of one of the boxes? I do know how to make those...

And those cupcakes are VERY sparkly! Lots of glitter used on those!

There was so much detail to each and every one of these displays. I asked one of the Helpers how long it had taken to get this display ready and she told me a couple of months... There must have been a TON of people working on it for that length of time. Everywhere you turned, there was something more beautiful than the place you'd turned from!

These boxes were some of my favorites:

Aren't they gorgeous? Wish I'd been able to get closer. They, too, were very sparkly - lots of glitter - and used the new Elegant Lines embossing folder. Mine's on it's way - I hope to have it in my grubby little paws by Friday!

Then I'll try to duplicate these - and I'm sure my attempt will fall short of the magnificence of these.

I'll post more photos of the items from The Sweet Shoppe soon...

I haven't been WOWWED by much at convention in a long time (I've gone to 21, so it takes some doing!), but this display certainly did it this year!

What have YOU been stamping lately? When would you like me to come do a workshop for you? Let me know!