Friday, May 28, 2010

Orchids!


This is the cattelaya orchid that is the ONLY orchid I've ever been able to grow in the house.

It blooms once a year these days, but when I first bought it about 10 years ago, it was blooming when I bought it and then didn't bloom for about 5 years.

Turned out, it wasn't getting enough light! I had a big ole ash tree in the backyard, directly behind the kitchen that was blocking enough light that this poor thing never bloomed.

I ALMOST threw it away. Then I had to have the tree removed (it was HUGE, and the roots were cracking the patio slab). And wouldn't you know it - the orchid bloomed that year!

I learned, after some research, that one of the reasons people think orchids are hard to grow (they're not) is because you have to figure out the light level and humidity --- well, this one sits right above the kitchen sink, so obviously, it's happy with the humidity.

The other advantage it has is that it IS right above the kitchen sink, and because it's right there in front of me, it gets more attention (i.e., water!).

I have a couple other cattelaya orchids on the patio - they bloom intermittently. This year the brown/red one bloomed, but the other one never did..

I also have some cymbidium orchids - you know, the ones they use tons of for the Rose Parade floats. They, too are pretty easy - but I found out they don't like direct sun.

Another instance where it didn't bloom until I put it in filtered shade - gee, just like where they live naturally! Whoda thunk?

Here's another plant that I have above my kitchen sink. It's a hoya, and is being grown hydroponically.
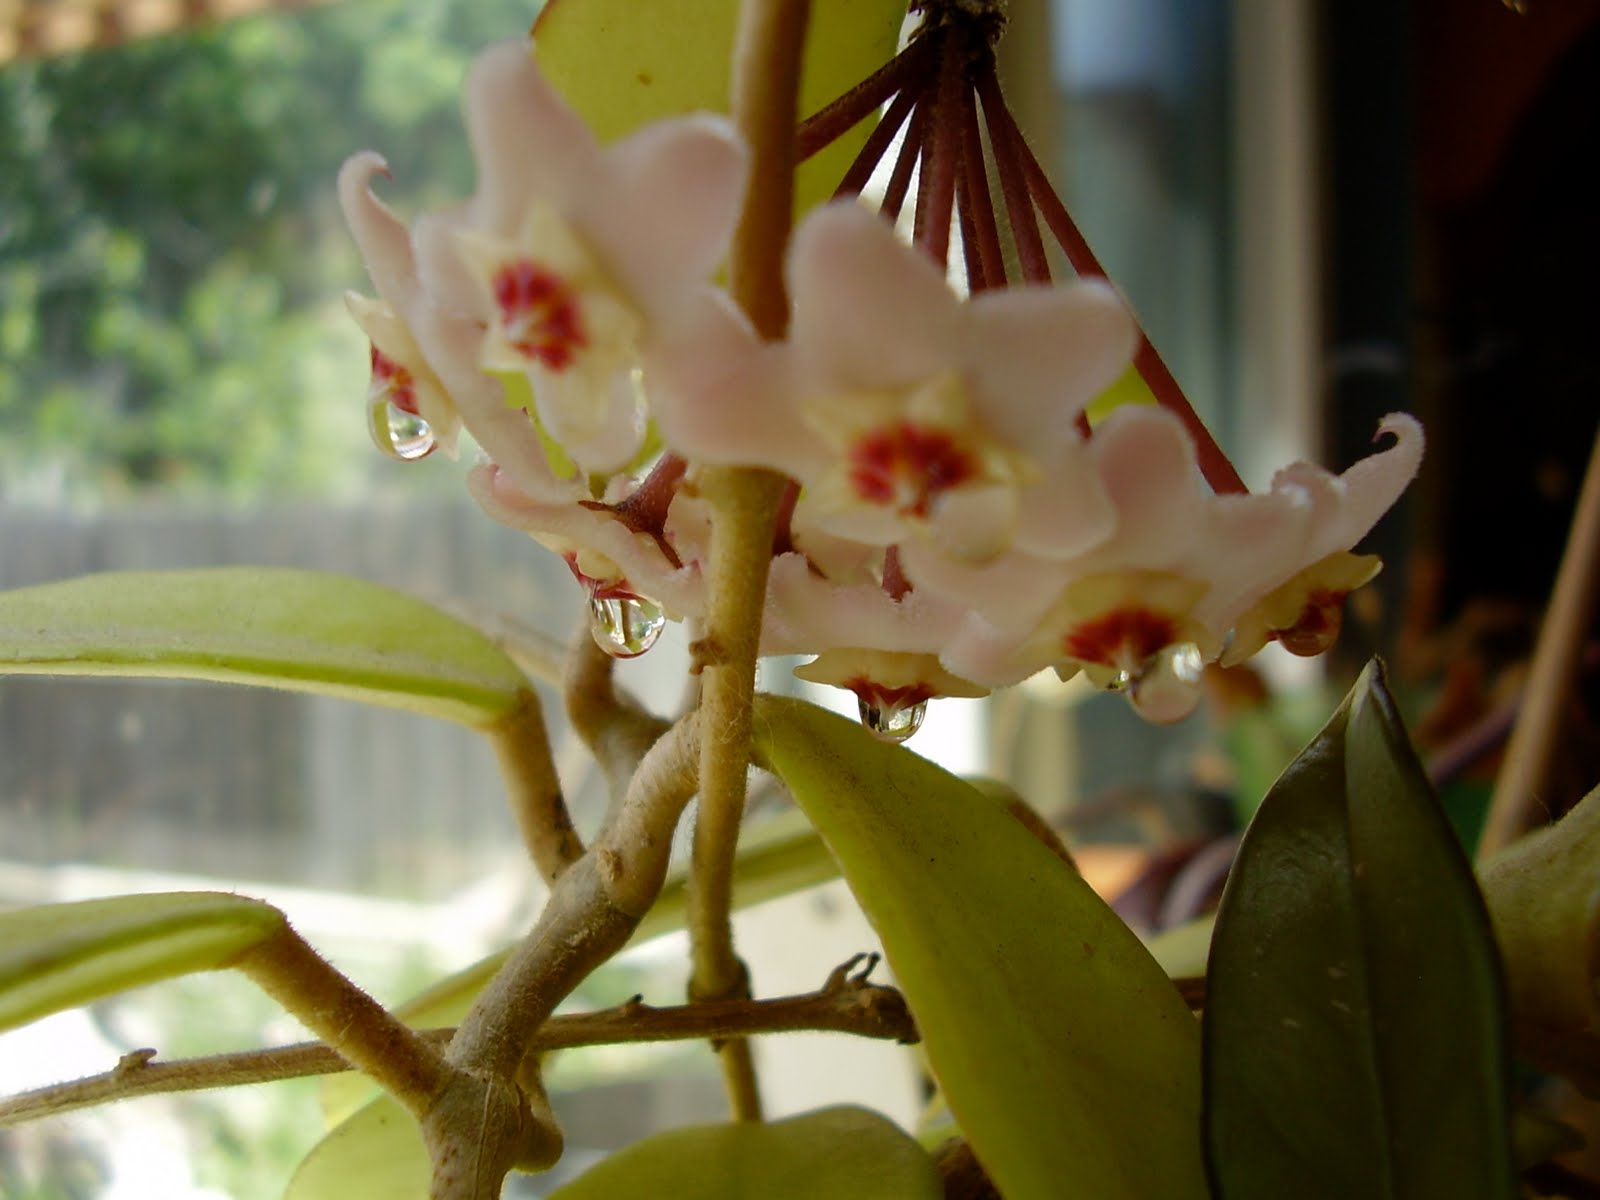
This is a cutting from a friend's mother's plant - it's about 20 years old.

It doesn't bloom all the time either. But this year, I happened to notice the bloom and took some pix.

Notice the "dew" dripping from the flowers? I'm told that attracts bees and hummingbirds out in the wild.

I really don't have anything stamped to show you tonight. I've been making the Thank You ATCs that I put in the Stamp Club orders each month, but that's ALL the stamping I've done lately.

This weekend I'll be going to my friend Roxy's in Nevada so I spent a little time tonight gathering up supplies so I can show her (if she hasn't already seen them) both the Black Magic and burnishing techniques.

She's a stamper, too, so we always try to have something to share with each other when we get together. I'll be sure to show you what I learn from her, OK?

The master bathroom is coming along nicely.

"Dr Destructo", as I call him, has completely gutted the bathroom, and has pretty much put it back together this week.

Tomorrow he starts mudding the new dry wall. Then on to installing the tile, painting, putting down the floor, etc.

Stay tuned for before and after photos, hopefully next week!


Have yourselves a happy and SAFE Memorial Day weekend!

Stamp a little!

A+

A+ - that's the grade I give this card that Natalie brought along for our swap!

Always simple cards from Natalie - but they're also always striking.

And VERY duplicatable. (is that a word?)

Very easy to be copied! How's that, instead?

Natalie used the "First Day" set from the Summer mini-catalog.


And used the returning color Pacific Point as the base of her card. Along with Real Red polka dot ribbon (one of my faves), and matching piece of striped Pacific Point DSP as a counterpoint.

Very striking - and very simple!

My swap card this month was one of those I made using the burnishing technique I shared with you a week or so ago.

For this example I used the Fifth Avenue Floral stamp set.

It came out quite nicely, wouldn't you say?


The master bath is in the process of being renovated now. So I'll be out and about tomorrow picking up more bath tiles, bull-nose and otherwise, along with paint, and choosing a vanity (and hoping the one I want doesn't have to be special ordered!).

Stay tuned for some Before and After pix of the ongoing changes here at my house!

In the meantime, drag those stamps out and MAKE SOMETHING!

Happy stampin'

Thursday, May 27, 2010

Copying IS OK!


Check out this card that Patti made for our Team Meeting this month. She copied it directly from the catalog (page 94, big catalog). This is the second month she's done that, and I really like that she does!

The cards are so much more beautiful in person, of course. And a photo isn't really much better than having the sample in the catalog.

But when you see the cards "live" (and feel free to stop by and look!), they're so much more stunning!

My point is, it's OK TO COPY!

That's why Stampin' Up! gives us such beautiful samples!

Found one you like? You can, of course, call me for help in determining which products were used to make the item - and I'll be happy to take your order for whatever you don't already have to make it!

Here is another card that was swapped at our May meeting...


Del deliberately made this card with all discontinuing colors - just so you'd have one last chance to look at what's soon going to be gone.

Isn't it beautiful?

Cameo Coral, Apricot Appeal, Gable Green...

Do you need pads, re-inkers or markers for any (or all!) of these colors? Call or email and order to me soon!

A lot of the discontinuing color's items are already on back order - which means, we can still order them, even though Stampin' Up! is having to place another order to get them to you.

At some point soon, though, SU will no longer be able to get the product, and it will change from " Back Order" to "No Longer Available" status. Don't dilly-dally! Call me and order today!

I'll have more cards to share with you tomorrow. C'mon back!

Wednesday, May 26, 2010

Richard - My Neighbor, My Friend


We all have those cards that we must make, but never really enjoy making.

Sympathy cards.

I, luckily, haven't had to make one for a very long time.


My neighbor of 23 years passed away last week. Not suddenly, but much too soon, and much too quickly. He was my "go to" guy. If I needed something (and I tried not to do that very often), I'd ask Richard, and he'd have a logical, well-thought out answer.

Once, several years ago, I asked him if he could fix this aluminum skillet I've had since I got married a zillion years ago.

The skillet's lasted MUCH longer than the marriage did, but it's one of my favorites. It makes an awesome fluffy omelet - you know - the kind you have to whip the whites, fold in the yolks, and bake in the oven. And cooks up those scrambled eggs like a dream, too.

After all these years, the rivets that hold the handle on, were getting very loose. Each time I used it, I was afraid the handle was going to break while I was carrying it from the stove.

I envisioned him having to weld it together, and didn't expect to see it for at least a couple of days.

Darned if he didn't hand it back over the fence in less than an hour. All fixed and ready for me to use again! Thanks, Richard! For everything!

I've been SO fortunate in having caring neighbors. None of them are "in your face" - just friendly, and there when you need someone or something.

My neighbor across the street, Polly, babysits my furry Kidz when I have to go out of town. She spoils them rotten while I'm gone - and they all come a runnin' when they hear her come to the door!

Each one comes in to say hi and then skedaddles - except for Velvet. She sticks around cuz she knows Polly's gonna make a huge fuss over her. Not that Velvet's not loved - but it's definitely a different kind of love from Polly.

I love living in my neighborhood. Thanks, Polly and all the rest of you.

And the neighborhood will sorely miss you, Richard. RIP.

Friday, May 21, 2010

Card Template # 3

Here's the third card template we made in Stamp Club this month.

I wanted something that used a shape other than rectangles. I'll be honest - I'm not a huge fan of circles.

Can't tell you why, I'm just not.

BUT, circles are certainly different than rectangles, so here's the third template.

It, too, is difficult to see, but has a 3/4 x 5-1/2 strip along the top, three circles equally spaced on top of the 3-1/2 by 2-1/2 center piece.

On top of the card base, there's also a piece that's 5-1/2 x 2.


The sample I made shows it so much better, don't you think?

I used a piece of Old Olive I'd run thru an embossing folder for the top piece.

The bottom piece is from the Island Oasis DSP in the Summer mini (117173 $9.95).

The card base is So Saffron, the saying from On Your Birthday (111664 $33.95), layered on to Old Olive again. The flowers are from the Tropical Party set (Summer mini 118515 $17.95), punched out with the 1-1/4 inch punch.

This is a very bright and cheery card and is rather generic, so could be used for anyone.

I hope I've inspired YOU to try to make up some card templates! They're so handy when your creative juices aren't flowing, but you need to make a card or two.

You're copying - but from yourself! How cool is that?

Happy stampin'!

Thursday, May 20, 2010

Card Template #2

Here's the second card template we made in stamp club this month.

I realize it's difficult to see, so let me describe it for you.

It's a 5-1/2 x 4-1/2 card that's got a center layer piece cut to 3-1/2 x 2-1/2.

There are two smaller pieces 2-1/2 x 1/2 inch toward the top and the bottom of the card.

A VERY simple card, don't you think?


Here's the same orientation sample I made.

I used the bear from the Teddy and Train (115219 $17.95) set as my main image.

I also used the rattle from the set in tone on tone to create a background for the card, then added two pieces of Brilliant Blue CS as accent pieces.

A VERY simple card.

I used the burnishing technique on the bear, and then colored in his hand and foot pads with a marker. His bow was colored with a marker, as well.


This is the other orientation for this template.

I used a stamp from the Elements of Style set as the main image as background (Dusty Durango). And then stamped another stamp from the same set in tone on tone. In this instance, it's Crushed Curry.

It's a nice subtle look, and easily done.

I started with a larger center piece, but after using the Pinking Hearts punch (YES! it, too, is still available! 117649, $15.95), it was smaller than I would have liked.

So, I just stamped my greeting on a piece of Dusty Durango CS (matching the ink color of the main image), punched it out with an oval punch, then layered that on to a piece of white CS punch with the scallop punch.

Added a couple of pieces of Dusty Durango DSP and the card was finished!

Come back tomorrow to see the third, and final (for now!) card template.

Wednesday, May 19, 2010

Card Template # 1

For our stamp club meeting this month I had them make card templates.

The idea is to give them something to help them make cards more quickly - they have the template already in front of them, and all they have to do is choose the stamps and card stocks to make the cards.

I've done this a number of times over the years, and the club members tell me they use them all the time.

I try to keep them very simple - when you need a card quickly, you DON'T want complicated!

I have them make them out of white card stock so they've got a clean slate each time they want to duplicate the template - no bias from colors or stamp sets.

Here's the first template.

I give them a sheet of paper with dimensions written down and a visual image of the card.

BUT, I also tell them there's nothing sacred about those dimensions.

What's important is the ratio of all the pieces.

So, even though the top piece on the small layer says 2-1/4 x 3, you could use something that was 2 x 3 or 2-1/2 by 3-1/2 and it would work.

I start a LOT of cards with a scrap of white paper that I've stamped something on - most of the time, I'm using a new set and just want to see the image stamped. From there I build a card.

Something that IS somewhat sacred, though, is the dimensions of the layers. About a year ago I spent one whole post discussing this.

A good rule of thumb is to make each layer smaller in both directions than the one underneath it by 1/4 inch.

So, if the card base is 5-1/2 x 4-1/4, your next layer should be 5-1/4 x 4. And the next layer on top of that would be 5 x 3-3/4.

I also tell them that many times they can change the orientation of the card and the template will still work.

Here are the two samples I worked up using this template.

I used the Filigree background stamp with White Staz-on, and added a piece of Tempting Turquoise that I'd run through an embossing folder.

This could just as easily been a piece of ribbon, if I'd wanted.


And here's the same template oriented the other way:

For this one, I only used one background layer instead of two, and the greeting is larger than the 2-1/4 x 3 that I used on the template.

But it's basically still the same card.


Come back tomorrow for the second template!